How to redirect a wordpress site to another domain?
If you’re a WordPress user and you’d like to switch to a new, shiny domain that better suits your needs, you'll need to undergo a WordPress domain change. Depending on the size of your WordPress site, this can be quite an operation. It should be done smoothly, to prevent issues such as traffic loss and damage to your SEO.
But how do you do this in the easiest and best way possible? In this guide, we’ll discuss how to change to a new domain for your WordPress site.

In this article you'll find:
- Why you'd want to change the domain name of your WordPress site
- Explanation of what a domain redirect is
- Why you'd want to redirect your old domain to the new domain?
- Ways to redirect your old WordPress URLs to a new domain name
- Why you'd want to use a dedicated domain redirect service
- How to change domain names for a WordPress site using redirect.pizza
Why would you want to change the domain name of your WordPress site?
Changing domains, or moving to a new domain in WordPress, is necessary when you change the domain name of your WordPress site. But why would you even want to change the domain name of your WordPress site? Or move your WordPress site to a new domain? There are many good reasons to change the domain name of your WordPress site. Maybe the domain name you’ve always wanted has suddenly become available. But your motivations could also be more strategic. Let’s take a look at some of them.
Rebranding
Are you rebranding, and starting over with a fresh design and a fresh name? Then you’ll need a brand new domain name, too. One that fits the new brand name, and reflects your image.
Mergers and acquisitions
The merger or acquisition of companies often means you’ll need to create a whole new identity. And this calls for a brand new domain name. All of the content from the two previous WordPress sites will need to be moved to the new domain.
When changing the top-level-domain (TLD)
By changing the top-level-domain (TLD) you can give your website more focus, or stand out from the rest. For instance, a TLD such as .io communicates you’re a tech company, and a TLD like .pizza will be something different, attracting attention.
Copyright issues
Even with the best intentions, sometimes it happens you’ll find out that your domain name is infringing on intellectual property. If your domain infringes on copyright, changing it can prevent legal trouble.
What is a domain redirect?
A domain redirect, as the name implies, is used to redirect traffic from one domain to another. Or to a URL from one domain to another URL. So traffic intended for your old WordPress domain can be automatically redirected to any place you’d like.

Say, for instance, you bought yourself the new domain new-example-domain.com. Of course, you can’t just start using this new domain and expect all your users to instantly know about it. Your old domain will probably still be visited. That’s why the smartest thing to do is set up a domain redirect. Every user visiting your old domain will automatically be redirected to your new domain.
You can also redirect your www. subdomain to your apex domain, also called your root domain or naked domain. Then you would be redirecting a link such as
https://www.example.com to https://example.com.
For redirecting a www. subdomain to an apex domain, there are many other good reasons to think of.
Why would you want to redirect your old domain to the new domain?
The most important reasons to redirect your old WordPress domain to a new one have to do with user experience and page rank, also known as SEO authority. If you redirect your entire WordPress site to a new domain, you’ll limit the loss of traffic while your trusted content is still findable by search engines.
If you change domains without setting up a redirect, your old URLs will lead to a 404 error. This is damaging to your general user experience (UX), and your WordPress SEO value. Pages that result in a 404 error can damage the SEO of your site.
Changing domains will always affect SEO authority in some way. It’s impossible to just ‘transfer’ your rankings from your old WordPress domain to the new one, unfortunately. Google will have to recrawl, re-evaluate, and reindex each page. But with the proper redirects, your numbers will be back to the pre-domain change level in no time.
Your old domain also holds domain authority from backlinks, which also affects your page rank. Setting up a redirect from your old WordPress domain to your new one will help keep all the backlinks you’ve accumulated over the years. These will be instantly redirected to the new domain, and all of your content will still be as easy to find as ever.
Ways to redirect your old WordPress URLs to a new domain name
So if you want to avoid losing traffic as much as possible while keeping your SEO intact, you’ll need to set up a redirect, redirecting your old WordPress site to a new domain. But where do you start? We’ll discuss the important steps here.
This guide specifically focuses on redirecting a WordPress website with a custom domain. So, for instance, redirecting:
https://olddomain.com to https://newdomain.com.
If you want to redirect a website hosted on a WordPress domain (e.g. https://example.wordpress.com), you can visit their site redirect support page.
Before you start, make a backup of your website and create a list of URLs to redirect
Making a backup is really important. Without a backup, you risk losing all of your content in case your database gets erased or corrupted. Backups of a WordPress site can be made via WordPress, via a WordPress plugin, or your hosting provider.
Once you’ve made a backup, you can start by creating a list of all the URLs of your WordPress site that you want to redirect.
Secondly, Choose a new domain name and set it as your primary address
To move your WordPress site to a new domain, you’ll first need to choose and purchase a new domain name. You can purchase your shiny new domain via domain registrars, such as Godaddy or Namecheap. As soon as you’ve acquired your new domain name, you can move on to the next step and set it up as the primary address of your website.
You can change the primary address of your website via your hosting provider or via WordPress itself, depending on how you’ve implemented it.
How to redirect the old domain to a new domain:
The first option is via WordPress domain forwarding. This can be done in the WordPress dashboard. Keep in mind, however, that this option only comes with the most basic features for redirects.
Things to consider when choosing Wordpress Domain Forwarding to redirect your domain:
- Lack of control: You can only create basic redirect rules. There are no options for more complex redirects needed for changing URL structures on your new domain.
- Takes a lot of time to implement and maintain: If you want to change your new domain’s URL structure, you’ll need to manually enter all URLs.
- No HTTPS support: WordPress will automatically redirect all your old URLs to the new URLs without HTTPS.
- No redirect analytics: WordPress’ domain forwarding feature doesn’t give any insight into the redirected traffic, or potentially broken redirects.
There are several plugins available in WordPress that can help you redirect the URLs of your old WordPress domain to the new domain. Just have a look in the plugin store to find one that fits your needs.
Things to consider when choosing a WordPress plugin to handle your domain redirects:
- Performance Impact: Using WordPress plugins for redirects can slow down your website and harm SEO and user experience.
- Dependency on Plugins or Extensions: In WordPress, using plugins for redirects can pose risks due to compatibility, updates, and security vulnerabilities.
- Often lacking SSL support: WordPress plugins will often lack SSL support, which means your old URLs will be redirected to insecure HTTP URLs.
The third, but not the easiest option, is to do it manually. This can be done by editing the .htaccess file on your server. It does require a bit of coding knowledge,
The coding involves adding specific rewrite rules to the .htaccess file. These rewrite rules are set to direct traffic from the subdomain to a new location. We’ll quickly guide you through it step by step.
- First, log in to your web server via FTP (File Transfer Protocol).
- Open the .htaccess file in the root directory of the WordPress installation. If you can’t find the file, select the “show hidden files” option.
- When you’ve swapped to a new URL, and changed domain names, you’ll want to redirect the entire domain. To do this, enter the following code in the .htaccess file. This will automatically redirect all of your WordPress subpages to the corresponding subpages of the new domain.
RewriteEngine On
RewriteBase /
RewriteCond %{HTTP_HOST} ^(www\.)?old-website\.com$ [NC]
RewriteRule ^(.*)$ https://www.new-website.com/$1 [R=301,L]
It’s also possible to set up a 301 redirect for a specific WordPress article. This works similarly. The code you’ll need to enter goes as follows:
redirect /old-content https://new-website.com/new-content
Things to consider when manually redirecting your domain:
- Can be difficult to implement: You’ll need to modify the server files yourself. If you want to make more detailed redirects, the difficulty increases.
- Error-prone:
When you incorrectly modify the server files, your whole website can become unreachable. - High maintenance: maintaining redirects can be a time-consuming task as you’ll constantly need to edit the server files (e.g. .htaccess)
- No redirect analytics: There are no analytics available for manual redirects
Making a backup is extremely important if you’re planning to set up redirects manually since small errors can cause serious problems in the functioning of your WordPress site.
So now that you’re familiar with each method, you can decide for yourself which method is the best fit for your demands. Each method has its pros and cons, and there are several things to consider. In the next part, we’ve made an overview of the limitations of each method.
Something to keep in mind while considering all this: dedicated domain redirection services, such as redirect.pizza, offer a useful features and benefits over the options mentioned above.
Why use a dedicated domain redirect service such as redirect.pizza for your domain redirects?
There are a number of significant benefits for using a dedicated domain redirect service such as redirect.pizza.
With redirect.pizza, you can use any redirect type you like. We offer advanced redirect options, such as path forwarding and other complex redirect rules. redirect.pizza also supports a wide variety of destination variables.
Broken destination monitoring is another feature that comes with redirect.pizza. With this feature, you can always be sure the destination is reachable.
One of the most important things that redirect.pizza takes care of is your security. redirect.pizza provides automatic HTTPS. With this feature, all SSL certificates will be automatically renewed, keeping your security up to date at all times.
redirect.pizza includes a useful analytics tool, you can keep track of your redirects' performances. The tool keeps a clear overview of data such as location, device, referrer, and requested pages of your visitors.
Aautomatic DNS makes it possible to apply automatic DNS in bulk, on multiple hosts or domains in one go. It’s the easiest way to manage all of your redirecting needs from a single platform.
redirect.pizza provides guaranteed responsiveness and the fastest redirects possible. This is made possible with our high-performance edge network. With our global presence, we ensure minimal latency, enhancing overall user experience.
How to change domain names for a WordPress site using redirect.pizza
You can get started by entering your old domain and new domain above. Here is a breakdown of the key steps involved in redirecting your old domain using redirect.pizza:
- 1
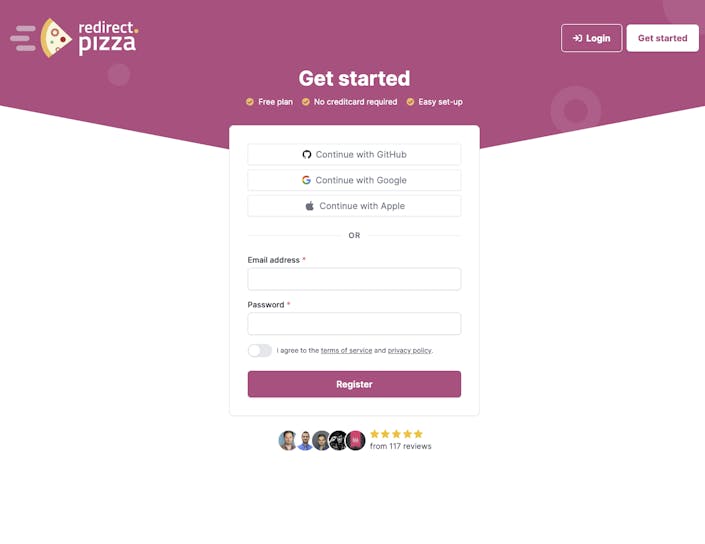
Step 1: Create a free account
Create a redirect.pizza account. Once you've created the free account, you can access our redirect features.
- 2
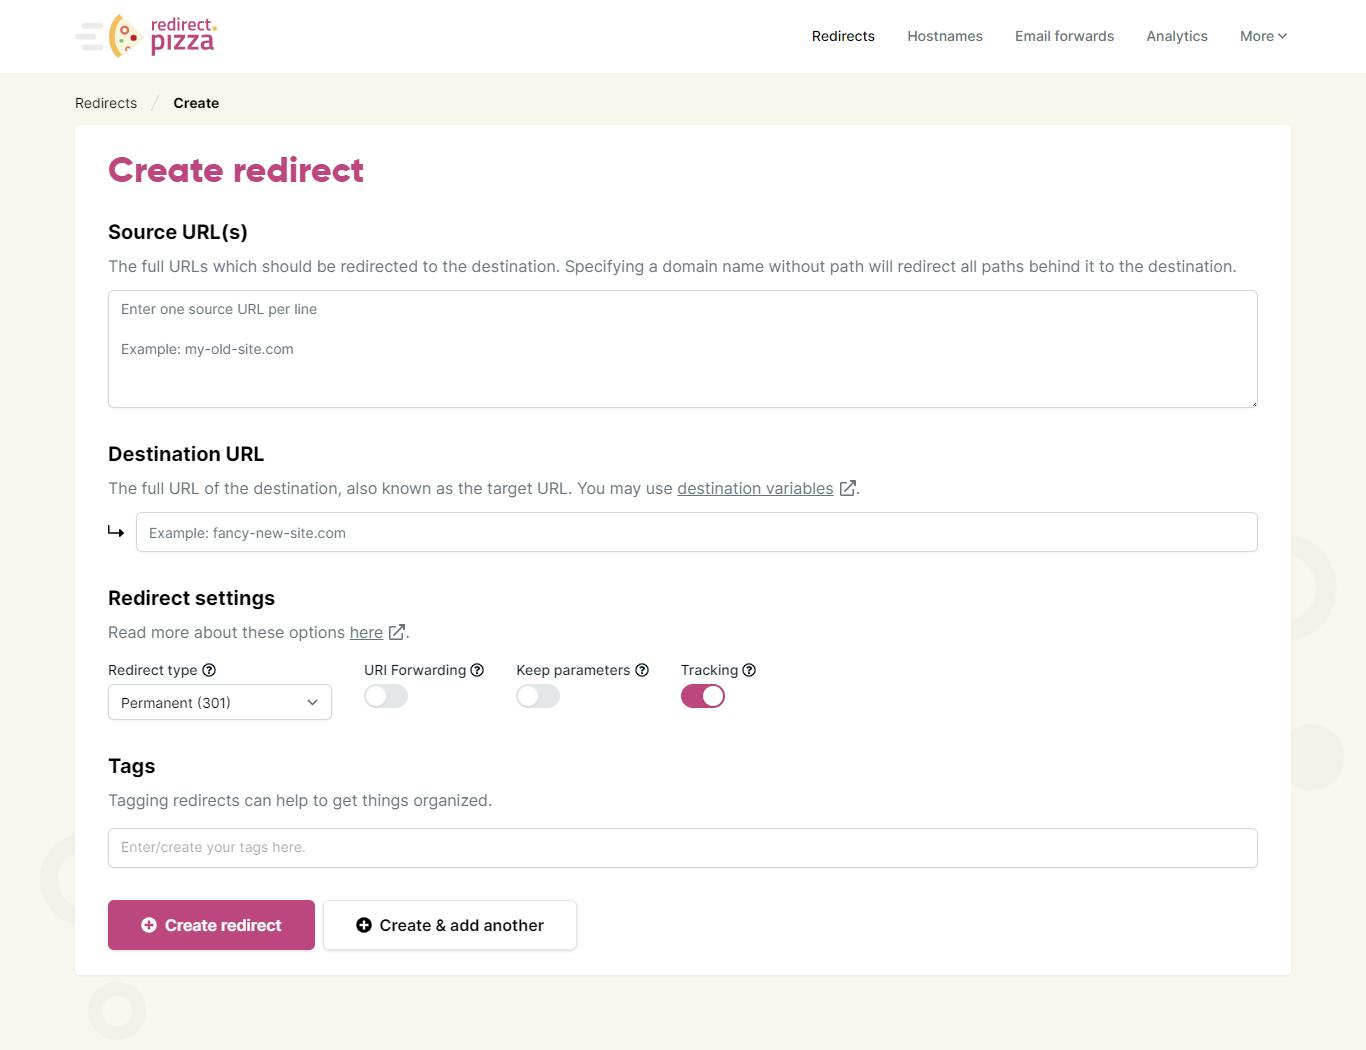
Step 2: Create redirect
After signing up, click on "create a redirect" to get started. In the create a redirect window, enter the source URL (such as the subdomain) and the destination URL (where the subdomain will be redirected to). This is where you'll add your redirect list to implement the redirects in bulk. Learn more in our getting started guide.

- 3
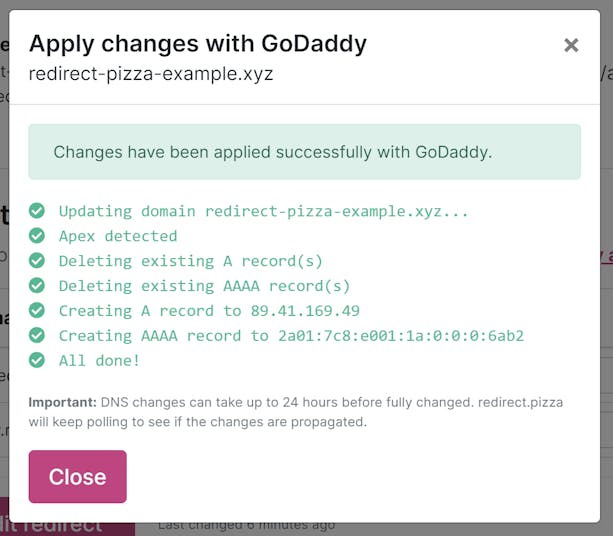
Step 3: Adjust DNS settings
The required DNS change pops up. Go to your domain registrar to make this DNS change for the A record. Alternatively, you can use our Automatic DNS feature to make these changes. It may take up to 24 hours for the DNS changes to propagate.
- 4
Step 4: Test your redirect and keep track of your analytics
Type your (old) source URL in the address bar of your browser and click "enter". Are you redirected to the destination URL? Then the redirect is working! You can keep track of your redirect using the Redirect Analytics window. Are you experiencing issues? Check out our redirect troubleshooting guide.