Must have tools when changing domain names

Michel Bardelmeijer is Tech Lead and Sales at redirect.pizza, where he helps DevOps and IT teams solve domain redirect challenges at scale. Michel has guided organizations like SD Worx, Zurich Airport and Harvard through complex redirect scenarios involving thousands of domains.
Have questions about bulk redirects, HTTPS migrations, or domain consolidations? Connect with Michel on LinkedIn or reach out to the redirect.pizza team.
Changing domain names means migrating your entire website to a new address. Every page, every asset, every URL needs to end up in the right place on the new domain. Get it wrong, and you lose traffic, break bookmarks, and tank your search rankings.
The good news: you do not need to figure it all out manually. The right combination of tools covers the critical parts of a domain migration, from crawling your existing site to setting up redirects to monitoring performance after launch. This resource covers the tools you actually need, when to use them, and how they fit into a complete redirect strategy.
Key Takeaways
- A domain migration requires coordination between analytics tools, crawlers, backup solutions, redirect services, and DNS monitoring. No single tool covers everything.
- Build a URL mapping spreadsheet before you touch anything. Map every old URL to its new destination, starting with your highest-traffic pages.
- Use Google Search Console's Change of Address tool to signal your migration to Google. This is a step many teams skip, and it slows down reindexing.
- CMS-built-in redirect features work for small sites but lack analytics, automatic HTTPS, and bulk import support. A dedicated redirect service handles migrations with hundreds or thousands of URLs.
- After launch, verify your redirects with a crawling tool and monitor traffic on both the old and new domain for at least 6 months.

What is a domain migration?
A domain migration moves your website from one domain name to another. All content, images, files, and URLs transfer to the new address. The old domain needs 301 redirects pointing to the corresponding pages on the new domain so that existing links, bookmarks, and search engine rankings carry over.
Learn more about domain migrations
What is the difference between a domain migration and a website migration?
A domain migration is specifically about changing your domain name. The website itself (CMS, server, design, URL structure) stays the same. You are just giving it a new address.
A website migration is broader. It can include changing your CMS (for example, moving from WordPress to Shopify), switching hosting providers, restructuring your URL paths, redesigning the site, or moving from HTTP to HTTPS. A website migration may or may not involve a domain name change.
The key distinction matters for planning: a domain migration is already complex enough on its own. If you are also changing your CMS or URL structure at the same time, you are stacking risks. Best practice is to handle a domain migration as a standalone project and make other changes separately. For the full process, see our domain migration SEO checklist.
Best practices before you start
Before picking tools, get the fundamentals right. These five practices prevent the most common migration failures.
- Treat the migration as a standalone project. Do not combine a domain change with a CMS migration, URL restructuring, or redesign. Each change introduces its own risks. Handle them separately.
- Build a complete URL map. Crawl your current site and export every URL. Map each old URL to its corresponding new URL in a spreadsheet. Start with your highest-traffic and highest-ranking pages. This mapping becomes the input for your redirect setup.
- Back up everything first. Database, files, images, configuration. If the migration goes wrong, you need a clean rollback point.
- Use the right redirect type. For permanent domain changes, use 301 redirects. They tell search engines to transfer ranking signals to the new domain. 302 redirects are only appropriate if the change is genuinely temporary.
- Monitor for at least 6 months. Traffic dips are normal in the first weeks after a migration. What matters is the recovery trend. Keep Google Search Console, analytics, and your redirect service running on both the old and new domain.
For a more detailed walkthrough, including a pre-launch and post-launch task list, see our domain migration SEO checklist.
The tools you need for a domain migration
Domain migrations involve multiple moving parts. No single tool handles everything. Here is what you need, organized by function.
1. Website crawling tools
A crawler maps your existing site structure: every page, image, file, and internal link. This is the foundation for your URL mapping spreadsheet.
Screaming Frog is the most widely used option. It crawls your live site and exports a complete list of URLs with status codes, titles, meta data, and internal link counts. Use it before the migration to build your URL map, and after the migration to verify that all redirects resolve correctly and that no redirect chains have formed.
A redirect chain is a sequence of multiple redirects linked together, where URL A redirects to URL B, which redirects to URL C. Google follows a maximum of 5 hops in a chain, but even shorter chains waste crawl budget and slow down page loads. Crawlers catch these immediately.
2. Google Search Console
Search Console serves three critical functions during a domain migration:
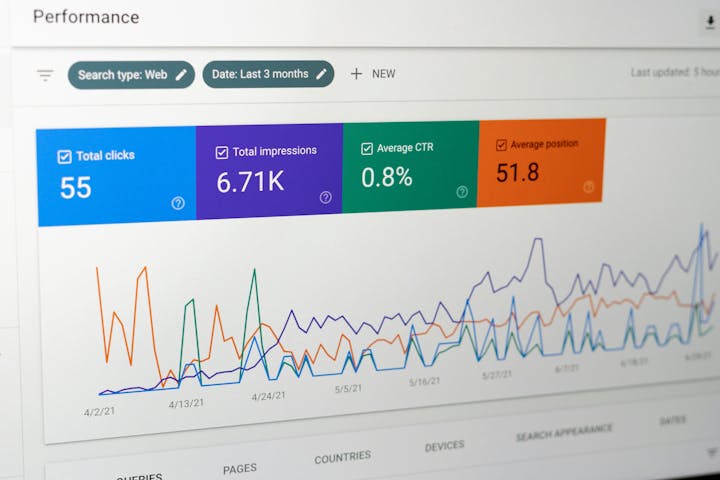
Before the migration, use the Performance report to identify your highest-impression and highest-click pages. These are the URLs where a broken redirect would cost you the most traffic. Prioritize them in your URL map.
During the migration, use the Change of Address tool in Search Console to formally notify Google that your site has moved to a new domain. This step accelerates reindexing and is one of the most frequently skipped steps in domain migrations. You need verified ownership of both the old and new domain to use it.
After the migration, monitor the Coverage report and Performance data on both the old and new properties. Watch for crawl errors, indexing drops, and ranking shifts.
3. Google Analytics
Set up your analytics property for the new domain before launch, not after. If you are using GA4, create a new data stream for the new domain so tracking starts collecting data immediately when the migration goes live.
After the switch, the most useful report is the Landing Page report filtered by organic traffic. Compare it against a baseline export from the weeks before migration. Pages that show a sharp traffic drop likely have broken or misconfigured redirects. Pages that show zero traffic on the new domain but still show traffic on the old domain indicate redirects that are not firing at all.
Keep the old domain's analytics property active for at least 6 months. You want to see old-domain traffic trend toward zero as search engines pick up the new URLs. If traffic to the old domain stays flat or increases, your redirects are not doing their job. For redirect-level traffic data (per-URL clicks, referrers, devices), a dedicated redirect service with built-in analytics complements what GA4 shows at the page level.
4. Backup tools
A full backup of your website (database, files, configuration) is a prerequisite, not an afterthought. Most hosting providers and CMS platforms include backup functionality. WordPress has dedicated backup plugins. For critical migrations, third-party solutions like Acronis True Image provide an additional safety net.
5. URL mapping and bulk redirect tools
For small sites with a handful of pages, setting up redirects manually works fine. For migrations involving dozens, hundreds, or thousands of URLs, you need a bulk approach.
Start by exporting your URL list from your crawler and building a mapping spreadsheet with two columns: old URL and new URL. Then import that mapping into your redirect service.
Most CMS-built-in redirect features handle one redirect at a time and lack support for bulk imports. A dedicated redirect service like redirect.pizza supports CSV bulk import, which lets you upload your entire URL mapping at once. Combined with automatic HTTPS and redirect analytics, this removes the manual overhead that makes large migrations error-prone.
6. DNS propagation checker
After you update your DNS records to point to the new domain, propagation can take up to 24 hours (sometimes longer depending on TTL settings). Tools like whatsmydns.net let you check propagation status across multiple global DNS servers in real time, so you know when the switch is actually complete before you start testing.
7. Redirect testing tools
Once your redirects are live, test them. Manually spot-check your most important URLs by entering the old address in a browser and verifying you land on the correct new page. For a faster check, use the redirect.pizza redirect tester to verify individual URLs without leaving your browser.
For full-site validation, run another Screaming Frog crawl against the old domain and check that every URL returns a 301 status code pointing to the correct new URL.
Key benefits of redirect.pizza for domain redirects:
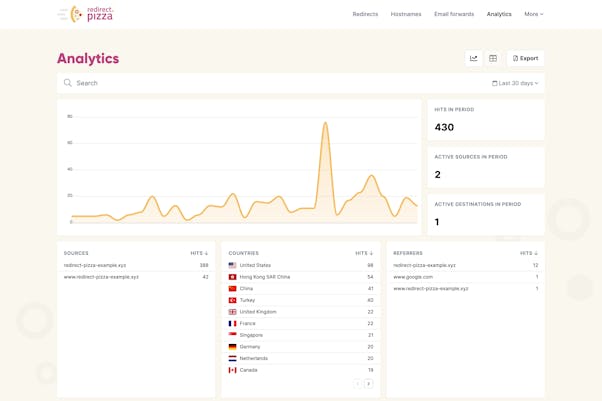
With our detailed analytics tool, you can easily see how your redirects are doing. It gives you clear info on data about the location of your visitors, what device they're using, from where they were referred, and which pages they're looking at.
Ensuring your security is a top priority at redirect.pizza. With our feature for automatic HTTPS, we’ll guarantee that all your SSL certificates are consistently renewed, keeping your security always up to date.
redirect.pizza assures fast, reliable redirects using our high-performance edge network. With servers spread over the world, we minimize delays, giving users a smoother experience.
With redirect.pizza, there are plenty of advanced redirect options available. These include features such as path forwarding and other complex redirect rules. We also support many types of destination variables.
Our feature for broken destination monitoring will always ensure that your destination is reachable.
Automatic DNS makes it possible to apply automatic DNS in bulk, on multiple hosts or domains in one go. It’s the easiest way to manage all of your redirecting needs from a single platform.
How to redirect a domain using redirect.pizza
To get started, simply enter your old and new domains above. Here's a step-by-step guide to redirecting your old domain using redirect.pizza:
- 1
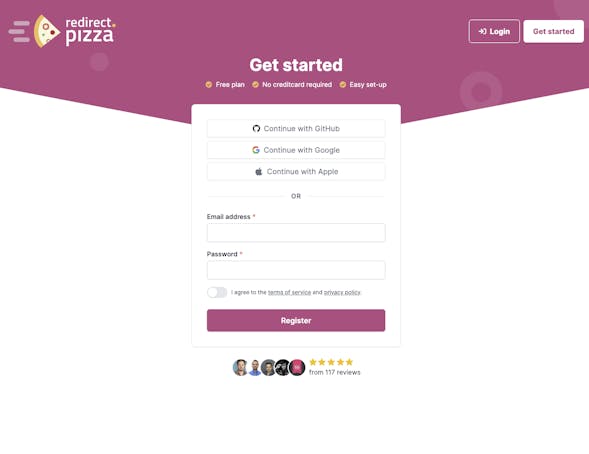
Step 1: Create a free account
Create a redirect.pizza account. Once you've created the free account, you can access our redirect features.
- 2
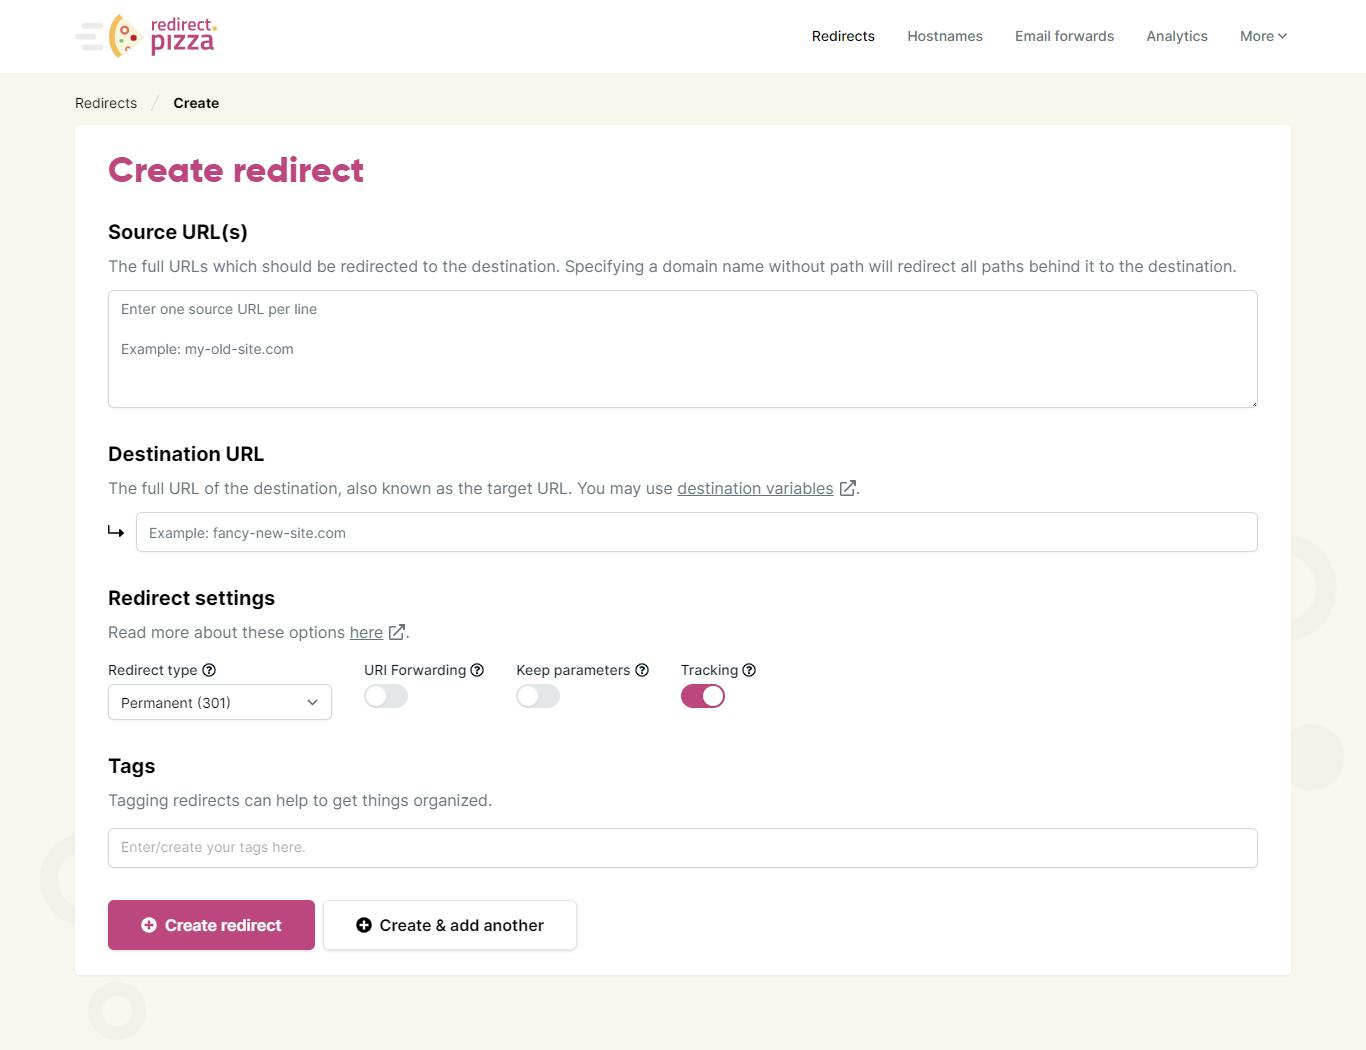
Step 2: Create redirect
After signing up, click on "create a redirect" to get started. In the create a redirect window, enter the source URL (such as the subdomain) and the destination URL (where the subdomain will be redirected to). Learn more in our getting started guide.

- 3
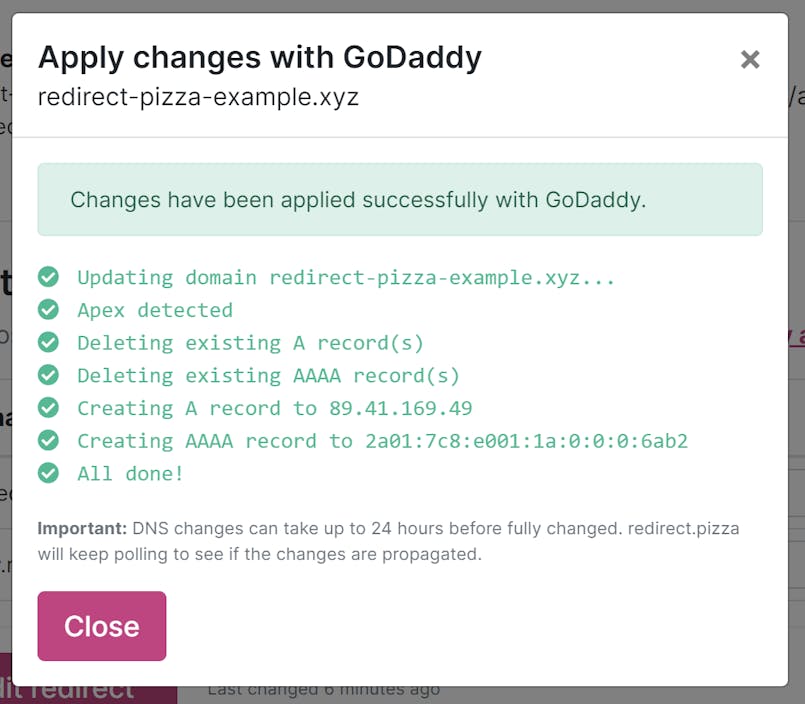
Step 3: Adjust DNS settings
The required DNS change pops up. Go to your domain registrar to make this DNS change for the A record. Alternatively, you can use our Automatic DNS feature to make these changes. It may take up to 24 hours for the DNS changes to propagate.
- 4
Step 4: Test your redirect and keep track of your analytics
Type your (old) source URL in the address bar of your browser and click "enter". Are you redirected to the destination URL? Then the redirect is working! You can keep track of your redirect using the Redirect Analytics window. Are you experiencing issues? Check out our redirect troubleshooting guide.
Conclusion
A domain migration is a coordination exercise, not a single-tool problem. Crawl your current site, build a URL map, set up 301 redirects in bulk, notify Google through the Change of Address tool, and monitor both domains for months after launch.
The most common failures happen when teams skip steps: no URL mapping, no bulk redirect tool, no DNS monitoring, no Change of Address notification. With the right tools in place, most of those risks disappear.
Frequently Asked Questions
At minimum, you need a website crawler (like Screaming Frog) to map your existing URLs, Google Search Console to notify Google and monitor reindexing, a backup solution, a redirect service that supports bulk imports, and a DNS propagation checker. For large migrations with hundreds of URLs, a dedicated redirect service with CSV import and automatic HTTPS handling replaces the manual work that CMS-built-in redirect features cannot scale.
It depends on the size of your migration. For a site with fewer than 20 pages, CMS-built-in redirect features may be enough. For larger sites, CMS tools hit their limits quickly. They typically lack bulk import, path forwarding, HTTPS provisioning, and redirect analytics. A dedicated service like redirect.pizza handles CSV bulk uploads, provisions SSL certificates automatically, and gives you per-redirect traffic data so you can verify that every redirect is working after the migration.
Start by manually testing your 10-20 highest-traffic URLs: enter the old URL in your browser and confirm you land on the correct new page. Then run a full crawl of your old domain with a tool like Screaming Frog to check that every URL returns a 301 status code and points to the right destination. Look for redirect chains (A to B to C), 404 errors, and incorrect destinations. Use Google Search Console's Coverage report to catch any pages that Google could not crawl or index on the new domain.
A domain migration changes your domain name while keeping everything else (CMS, design, URL structure) the same. A website migration is broader and can include changing your CMS platform, switching hosting providers, restructuring your URL paths, or moving from HTTP to HTTPS. For example, moving example.com to newbrand.com is a domain migration. Moving from WordPress on shared hosting to Shopify on a new server is a website migration. The two sometimes happen together, but handling them as separate projects reduces the risk of compounding technical issues.

